Sign in

| Created |  Urls Urls |
Favourites | Opened | Upvotes | Comments |
| 7 | 0 | 805 | 0 | 0 |
This tutorial is a step-by-step demo how to send emails in ASP.NET Core using Gmail SMTP for development & hMailServer for production.
Index :

Appendixes :

This tutorial will demo sending email from ASP.NET Core both on your development machine and on your production machine - the ASP.NET Core code is the same, but the SMTP servers are different :
SMTP servers used :
Here is a diagram of what I will build in this tutorial :

Note that there are 2 good reasons to NOT use hMailServer on our development machine :
Instead of only showing the email sending code, in this tutorial I will build a fresh new ASP.NET Core 3.0 App to showcase everything that is necessary to get ASP.NET Core emailing going.
First let's create the Visual Studio project and the folders & files that will become our ASP.NET Core App : (we will create a minimum ASP.NET Core MVC project)
Sending emails is a core functionality of most web applications and yet ASP.NET Core does NOT come with a proper SmtpClient - the official System.Net.Mail.SmtpClient is obsolete.
Microsoft recommends using MailKit (which I admit is the only reason I call it the best)
Luckily some people have created a modern SmtpClient called MailKit, MailKit.Net.Smtp.SmtpClient, recommended by Microsoft and with a lot of StackOverflow activity - this tutorial will use MailKit.
Ok, lets add MailKit to the Email project :
Gmail SMTP is perfect for development purposes not least because smtp servers provided by a hosting company typically does NOT allow you to send emails from your development machine (typically they only allows relaying emails sent from the host machine).
However before you can use Gmail SMTP a few things have to be done :
Ok, that is all what is needed, below we will use your gmail account (email address & password) to send email from a C# SmtpClient to any email address through the Gmail SmtpServer.
With the project, the folders & the code files created and the MailKit package added, we are ready to actual do some coding.
In Visual Studio open the Startup.cs file and change it to the following code : (this Startup.cs is for using ASP.NET Core 3.0, however I have supplied out-commented code for earlier versions)
using Microsoft.AspNetCore.Builder;
using Microsoft.AspNetCore.Hosting;
using Microsoft.Extensions.DependencyInjection;
using Email.Services;
namespace Email
{
public class Startup
{
/* BEFORE VERSION 3.0 START */
// private static IConfiguration Configuration;
// public Startup(IHostingEnvironment env)
// {
// var configBuilder = new ConfigurationBuilder()
// .SetBasePath(env.ContentRootPath)
// .AddJsonFile("appsettings.json", optional: false, reloadOnChange: true)
// .AddJsonFile($"appsettings.{env.EnvironmentName}.json", optional: true, reloadOnChange: true)
// Configuration = configBuilder.Build();
// }
/* BEFORE VERSION 3.0 END */
public void ConfigureServices(IServiceCollection services)
{
/* BEFORE VERSION 3.0 START */
// services.AddMvc(); // if using version earlier than 2.2
// services.AddMvc(options => { options.EnableEndpointRouting = false; }); // if using version 2.2
// services.AddSingleton<IConfiguration>(Configuration);
/* BEFORE VERSION 3.0 END */
/* VERSION 3.0 START */
services.AddControllersWithViews();
/* VERSION 3.0 END */
services.AddScoped<IEmailSender, EmailSender>(); // no matter what version
}
public void Configure(IApplicationBuilder app, IWebHostEnvironment env)
{
/* BEFORE VERSION 3.0 START */
// app.UseMvcWithDefaultRoute()
/* BEFORE VERSION 3.0 END */
/* VERSION 3.0 START */
app.UseRouting();
app.UseEndpoints(endpoints =>
{
endpoints.MapControllerRoute(
name: "default",
pattern: "{controller=Home}/{action=Index}/{id?}");
});
/* VERSION 3.0 END */
}
}
}
In the Startup.cs code you can see that if we use an earlier version than ASP.NET Core 3.0 we will typically write a lot of code to setup configuration and add the Configuration object to DI, while in version 3.0 we not only do not need to write code outselves to setup the Configuration object, we also don't need to add it to DI (both is default done in Program.cs).
However, with the Configuration object setup, it gives meaning to add the configuration values to appsettings, in this section we only add the development configuration, so open the appsettings.development.json file and fill in the Gmail SMTP connection details using your own email address and password :
{
"Email": {
"SmtpServer": "smtp.gmail.com",
"SmtpPort": "465",
"SmtpUsername": "yourGmailName@gmail.com",
"SmtpPassword": "yourGmailPassword",
"FromAddress": "yourGmailName@gmail.com",
"EnableSsl": "true",
"UseDefaultCredentials": "false"
}
}
Open the IEmailSender.cs file and add the Send interface member. Be sure it looks like this :
namespace Email.Services
{
public interface IEmailSender // don't forget the public modifier
{void Send(string toAddress, string subject, string body, bool sendAsync = true);
}
}
Open the EmailSender.cs file and implement the IEmailSender interface
using Microsoft.Extensions.Configuration;
using MimeKit;
namespace Email.Services
{
public class EmailSender : IEmailSender
{
private string _smtpServer;
private int _smtpPort;
private string _fromAddress;
private string _fromAddressTitle;
private string _username;
private string _password;
private bool _enableSsl;
private bool _useDefaultCredentials;
public EmailSender(IConfiguration configuration) // configuration is automatically added to DI in ASP.NET Core 3.0
{_smtpServer = configuration["Email:SmtpServer"];
_smtpPort = int.Parse(configuration["Email:SmtpPort"]);
_smtpPort = _smtpPort == 0 ? 25 : _smtpPort;
_fromAddress = configuration["Email:FromAddress"];
_fromAddressTitle = configuration["FromAddressTitle"];
_username = configuration["Email:SmtpUsername"];
_password = configuration["Email:SmtpPassword"];
_enableSsl = bool.Parse(configuration["Email:EnableSsl"]);
_useDefaultCredentials = bool.Parse(configuration["Email:UseDefaultCredentials"]);
}
public async void Send(string toAddress, string subject, string body, bool sendAsync = true)
{
var mimeMessage = new MimeMessage(); // MIME : Multipurpose Internet Mail Extension
mimeMessage.From.Add(new MailboxAddress(_fromAddressTitle, _fromAddress));mimeMessage.To.Add(new MailboxAddress(toAddress));
mimeMessage.Subject = subject;
var bodyBuilder = new MimeKit.BodyBuilder
{
HtmlBody = body
};
mimeMessage.Body = bodyBuilder.ToMessageBody();
using (var client = new MailKit.Net.Smtp.SmtpClient())
{
client.Connect(_smtpServer, _smtpPort, _enableSsl);
client.Authenticate(_username, _password); // If using GMail this requires turning on LessSecureApps : https://myaccount.google.com/lesssecureapps
if (sendAsync){
await client.SendAsync(mimeMessage);
}
else
{
client.Send(mimeMessage);
}
client.Disconnect(true);
}
}
}
}
The EmailSender class is initialized with all the configuration variables from appsettings (running on the development machine configuration is loaded from appsettings.development.json while then running on the production machine configuration will be loaded from appsettings.json)
Create the user interface for sending an email, open Index.cshtml and fill in the following code :
<style>
#divEmailForm {
display:grid;
grid-gap: 5px;
grid-template-columns: 100px 200px;
}
</style>
<div style="margin:0 auto;">
<form action="/Home/SendEmail" method="post">
<div id="divEmailForm">
<div><label>Email</label></div>
<div><input name="toAddress" placeholder="Email" style="width:100%;" /></div>
<div><label>Subject</label></div>
<div><input name="subject" placeholder="Subject" style="width:100%;" /></div>
<div><label>Message</label></div>
<div><textarea name="body" placeholder="Message" style="width:100%;height:150px;overflow:hidden;"></textarea></div>
<div></div>
<div><button type="submit">Send</button></div>
</div>
</form>
</div>
In the user interface code above there is a submit button called Send, which will post the form to the http endpoint specified in the form's action attribute "/Home/SendMail".
Open HomeController.cs and add the "/Home/SendMail" endpoint by creating an Action called SendMail. In the SendMail action we will activate the EmailSender.Send(...) function and then navigate the user back to the original user interface.
using System.Linq;
using Microsoft.AspNetCore.Mvc;
using Email.Services;
namespace Email.Controllers
{
public class HomeController : Controller
{
private IEmailSender _emailSender;
public HomeController(IEmailSender emailSender)
{
_emailSender = emailSender;
}
public IActionResult Index()
{
return View();
}
[HttpPost]
public IActionResult SendEmail()
{
var toAddress = HttpContext.Request.Form["toAddress"].FirstOrDefault();
var subject = HttpContext.Request.Form["subject"].FirstOrDefault();
var body = HttpContext.Request.Form["body"].FirstOrDefault();
_emailSender.Send(toAddress, subject, body);
return RedirectToAction("Index");
}
}
}
At last we are ready to test if we can actually send an email.
Congratulation ! - you are now able to send emails from ASP.NET Core to any email address via Gmail Smtp.
Now that we have a working email sending application, it is time to setup email sending infrastructure on a production server.
To send emails from asp.net core on your production, typically you may be using an email server provided by your hosting company or you may be using a dedicated 3.party SMTP service (likely costly), however for one reason or another it is also often the case that it is a better option to setup your own SMTP server - here I will show how to do that.
While we used Google SMTP on our development machine, we will use hMailServer on our production machine.
However, while we got the DNS part part of the email sending infrastructure automatically taken care of then using Google SMTP, we need to setup DNS then using our own email server.
You need to add an MX record to your DNS for mail clients and other mail servers to find your mail server.
Including support records, you need 3 DNS records - here exemplified for the topiqs.online domain :
| Type | Host | Value | Description |
| A | @ | 5.231.220.25 | Main A-record as they will look on most DNS Servers hosted by domain name registrars. |
| A | 5.231.220.25 | Specify a sub-domain called mail and specify the IP on which the sub-domain (mail.topiqs.online) is hosted, here hosted on the same server as the topiqs.online website (the poorer you are the more likely you have the email server on the same host as your web server). | |
| MX | @ | mail.topiqs.online | The actual MX record that email clients & other email servers are looking up then resolving your-name@topiqs.online. The MX record is the email clients and other email servers to find your email server on the IP address specified for mail.topiqs.online (above). |
(You of course need to change topiqs.online to your own domain and change 5.231.220.25 to the IP address of your own server).
Use nslookup to test your MX record :
Note that some email servers (most notably gmail) will NOT accept email sent from your email server, if there is no PTR record for your email servers hostname (above that would be mail.topiqs.online). The PTR record allows to resolve an IP address to a hostname (called reverse lookup), in the above example that would be : resolving 5.231.220.25 to mail.topiqs.online.
Say that a mail messages was sent to the gmail server from my email server on 5.231.220.25 and the mail message contains a hostname field with the value "mail.topiqs.online" - the gmail server will request a PTR record for 5.231.220.25 and compare with the mail message hostname field to see if they match validating whether the mail message is indeed sent from the hostname that it is saying it is.
To setup a PTR record you will need to ask your hosting provider to set it up for you.
Use nslookup to test your PTR record :
Ok, with the DNS setup and DNS testing out of the way, we can continue to install hMailServer.
On your production server :
On your production server
Port 25 is default used by clients and other email servers to send mail messages to you email server and also your email server will use port 25 to send mail messages to other email servers - in a default setup you need port 25 to be open.
Depending on your hosting situation, port 25 may default be closed, eg. if you have a VPS at a hosting company, the hosting company will typically not allow any traffic on port 25 - in this situation you will need your hosting company to open port 25 for relevant IP addresses on your VPS (my hosting company warned me that it is a bad idea, but allowed me use of port 25 after I accepted that they could close me down immediately in case of spam mails sent from my server).
There are too many different setup possibilities to go through them all here, however we can test port 25 to be sure that it is correctly setup :
Send email to hMailServer using SMTP :
Retrieving email from hMailServer using IMAP
This test is NOT necessary for our purpose as in this tutorial we only intend to use hMailServer for sending emails not receiving emails, however we do this test just for the fun of it
IMAP commands must be pre-fixed with a 'tag' that identifies the session - this allows multiple sessions to run at the same time (which again allows commands to be asyncronous). A tag can be anything we make up ourself and in this example it will just be 'a' (though for a real IMAP client you will typically use more descriptive tags).
Before this example gives meaning, you need to send an email to an account on the hMailServer, you can use the above example (telnet smtp) to send a test email.
Ok, your email server seems to work, let's try to send an email from the ASP.NET Core application.
This is our final goal - that we can send emails from ASP.NET Core on our production server using our own hMailServer installation.
{
"Email": {
"SmtpServer": "mail.topiqs.online",
"SmtpPort": "25",
"SmtpUsername": "topiqs@topiqs.online",
"SmtpPassword": "yourPassword",
"FromAddress": "topiqs@mail.topiqs.online",
"FromAddressTitle": "Topiqs",
"EnableSsl": "false",
"UseDefaultCredentials": "false"
}
}
Congratulations - you now have a production ready ASP.NET Core application able to send emails.
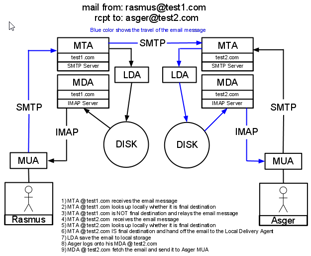
In the below picture email is sent from an account rasmus@test1.com to another account asger@test2.com
Building on the main email project, we need to :
Ok, I better show the full code for the files we need to change :
<style>
#divEmailForm {
display:grid;
grid-gap: 5px;
grid-template-columns: 100px 200px;
}
</style>
<div style="margin:0 auto;">
<form action="/Home/SendEmail" method="post" enctype="multipart/form-data"> <!-- Here (1) -->
<div id="divEmailForm">
<div><label>Email</label></div>
<div><input name="toAddress" placeholder="Email" style="width:100%;" value="rasserrummel@outlook.com" /></div>
<div><label>Subject</label></div>
<div><input name="subject" placeholder="Subject" style="width:100%;" value="subject " /></div>
<div><label>Message</label></div>
<div><textarea name="body" placeholder="Message" style="width:100%;height:150px;overflow:hidden;">body </textarea></div>
<div><label>Attachments</label></div> <!-- and here (2) -->
<div><input name="attachments" type="file" multiple /></div> <!-- and here (3) -->
<div></div>
<div><button type="submit">Send</button></div>
</div>
</form>
</div>
using Microsoft.AspNetCore.Http; // Here (1)
namespace Email.Services
{
public interface IEmailSender
{
void Send(string toAddress, string subject, string body, bool sendAsync = true, IFormFileCollection attachments = null); // and here (2)
}}
using System.Linq;
using Microsoft.AspNetCore.Mvc;
using Microsoft.AspNetCore.Http; // Here (1)
using Email.Services;
namespace Email.Controllers
{
public class HomeController : Controller
{
private IEmailSender _emailSender;
public HomeController(IEmailSender emailSender)
{
_emailSender = emailSender;
}
public IActionResult Index()
{
return View();
}
[HttpPost]
public IActionResult SendEmail()
{
var toAddress = HttpContext.Request.Form["toAddress"].FirstOrDefault();
var subject = HttpContext.Request.Form["subject"].FirstOrDefault();
var body = HttpContext.Request.Form["body"].FirstOrDefault();
var uploadedFiles = HttpContext.Request.Form.Files; // and here (2)
_emailSender.Send(toAddress, subject, body, attachments: uploadedFiles); // and here (3)
return RedirectToAction("Index");
}
}
}
using Microsoft.Extensions.Configuration;
using Microsoft.AspNetCore.Http; // Here (1)
using System.IO; // and here (2)
using MimeKit;
namespace Email.Services
{
public class EmailSender : IEmailSender
{
private string _smtpServer;
private int _smtpPort;
private string _fromAddress;
private string _fromAddressTitle;
private string _username;
private string _password;
private bool _enableSsl;
private bool _useDefaultCredentials;
public EmailSender(IConfiguration configuration)
{
_smtpServer = configuration["Email:SmtpServer"];
_smtpPort = int.Parse(configuration["Email:SmtpPort"]);
_smtpPort = _smtpPort == 0 ? 25 : _smtpPort;
_fromAddress = configuration["Email:FromAddress"];
_fromAddressTitle = configuration["FromAddressTitle"];
_username = configuration["Email:SmtpUsername"];
_password = configuration["Email:SmtpPassword"];
_enableSsl = bool.Parse(configuration["Email:EnableSsl"]);
_useDefaultCredentials = bool.Parse(configuration["Email:UseDefaultCredentials"]);
}
public async void Send(string toAddress, string subject, string body, bool sendAsync = true, IFormFileCollection attachments = null) // and here (3)
{var mimeMessage = new MimeMessage();
mimeMessage.From.Add(new MailboxAddress(_fromAddressTitle, _fromAddress));mimeMessage.To.Add(new MailboxAddress(toAddress));
mimeMessage.Subject = subject;
var bodyBuilder = new MimeKit.BodyBuilder
{
HtmlBody = body
};
/* and here (4) start */
if (attachments != null)
{
foreach (IFormFile attachment in attachments)
{
if (attachment.Length > 0)
{
using (var memoryStream = new MemoryStream())
{
await attachment.CopyToAsync(memoryStream);
bodyBuilder.Attachments.Add(attachment.FileName, memoryStream.ToArray(), ContentType.Parse(attachment.ContentType));
}
}
}
}
/* and here (4) end */
mimeMessage.Body = bodyBuilder.ToMessageBody();
using (var client = new MailKit.Net.Smtp.SmtpClient())
{
client.Connect(_smtpServer, _smtpPort, _enableSsl);
client.Authenticate(_username, _password);
if (sendAsync)
{
await client.SendAsync(mimeMessage);
}
else
{
client.Send(mimeMessage);
}
client.Disconnect(true);
}
}
}
}
While MailKit does support inline images, the support is weak and the most important method to create inline images seems to not work.
To embed an image inline in an email message using MailKit, you need to :
Ok, let's see the code :
"Linked resources are a special type of attachment which are linked to from the HtmlBody" (official)using Microsoft.Extensions.Configuration;
using Microsoft.AspNetCore.Http;
using System.IO;
using MimeKit;
using MimeKit.Utils; // Here (1)
namespace Email.Services
{
public class EmailSender : IEmailSender
{
private string _smtpServer;
private int _smtpPort;
private string _fromAddress;
private string _fromAddressTitle;
private string _username;
private string _password;
private bool _enableSsl;
private bool _useDefaultCredentials;
public EmailSender(IConfiguration configuration)
{
_smtpServer = configuration["Email:SmtpServer"];
_smtpPort = int.Parse(configuration["Email:SmtpPort"]);
_smtpPort = _smtpPort == 0 ? 25 : _smtpPort;
_fromAddress = configuration["Email:FromAddress"];
_fromAddressTitle = configuration["FromAddressTitle"];
_username = configuration["Email:SmtpUsername"];
_password = configuration["Email:SmtpPassword"];
_enableSsl = bool.Parse(configuration["Email:EnableSsl"]);
_useDefaultCredentials = bool.Parse(configuration["Email:UseDefaultCredentials"]);
}
public async void Send(string toAddress, string subject, string body, bool sendAsync = true, IFormFileCollection attachments = null)
{
var mimeMessage = new MimeMessage();
mimeMessage.From.Add(new MailboxAddress(_fromAddressTitle, _fromAddress));
mimeMessage.To.Add(new MailboxAddress(toAddress));
mimeMessage.Subject = subject;
var bodyBuilder = new MimeKit.BodyBuilder
{
HtmlBody = body
};
/* and here (2) start */
var embeddedImage = bodyBuilder.LinkedResources.Add(@"D:\_TEMP\email.png"); // change the path to an image on your own disk
embeddedImage.ContentId = MimeUtils.GenerateMessageId();bodyBuilder.HtmlBody = bodyBuilder.HtmlBody + @"<img src=""cid:" + embeddedImage.ContentId + @""" />";
/* and here (2) end */
if (attachments != null)
{
foreach (IFormFile attachment in attachments)
{
if (attachment.Length > 0)
{
using (var memoryStream = new MemoryStream())
{
await attachment.CopyToAsync(memoryStream);
bodyBuilder.Attachments.Add(attachment.FileName, memoryStream.ToArray(), ContentType.Parse(attachment.ContentType));
}
}
}
}
mimeMessage.Body = bodyBuilder.ToMessageBody();
using (var client = new MailKit.Net.Smtp.SmtpClient())
{
client.Connect(_smtpServer, _smtpPort, _enableSsl);
client.Authenticate(_username, _password); // If using GMail this requires turning on LessSecureApps : https://myaccount.google.com/lesssecureapps
if (sendAsync)
{
await client.SendAsync(mimeMessage);
}
else
{
client.Send(mimeMessage);
}
client.Disconnect(true);
}
}
}
}
Note that even if the BodyBuilder.LinkedResources.Add() function have overloads for linking images by byte arrays, it does not not work. Instead in a scenario there the images to be embedded are user defined, MailKit only offers an inconvenient solution : copying all the images to disk on the server and then linking the images by path.
Error : MailKit.Security.SslHandshakeException "An error occurred while attempting to establish an SSL or TLS connection".
Reason : this will of course happen if the port you try to connect to does not support the cryptographic protocol you are using. It happened for me then trying to connect to Gmail SMTP using port 587 then I should have used 465.
Error : MailKit.Security.AuthenticationException "AuthenticationInvalidCredentials: 5.7.8 Username and Password not accepted".
Reason 1 : this can be a case of bad credentials then connecting to Gmail SMTP - either your username or password is wrong.
Reason 2 : this can also be a case of OAuth version mismatch, eg. GMail SMTP using OAuth 2.0 while your client (in our case MailKit) does not - be sure to enable LessSecureApps for the Google account you use for authentication.